Monday, March 1, 2021

Quilting with Friends - Pre-Cut Jelly Rolls

Creativity is endless in Quilting!

I think that is why I like it so much, endless possibilities.... 

From choosing your design you want to quilt, to choosing your fabrics for your quilt.  
How you choose to quilt it, either by the old fashioned look of tying off your quilt with yarn or the more finished look of machine quilting.  There are few ways that you can finish your quilt, but these are the two that I use.

We'll a group of us have decided to get together to do our projects.  I love getting together with friends and family to do projects like these.... it is always so much fun.

Stephanie R. has choose Moda Batik fabric, called Sticks and Stones.
This fabric has a real rich earthy palette, that will blend with and decor. 


Stephanie D. has choose Island Batiks fabric, called Juicy Jewels.
This is a real beautiful color palette, that has a calming effect just by looking at it.  

Light a Lavender candle, snuggle into your quilt and start reading a good book.  
I already have a BOOK in mind!


They both have choose to do quilt designs that we have seen from Missouri Star Quilt Co. youtube tutorials.  They have an app that makes it so easy to keep up with their new additions... it's called 


Quilting Tutorials by Missouri Star Quilt Company

this is the IPad App link above.

BUT...  I'm sure they have a App for tablets also.  
Look for their icon above, when looking for the App. 


Below are the links for the two quilts that we made.  The Fence Rail tutorial and the Sticks and Stones tutorial.


Fence Rail Quilt Tutorial from Missouri Star Quilt Co.
Jenny Doan


Sticks and Stones Quilt Tutorial from Missouri Star Quilt Co.
Jenny Doan 


*************************************************


Gathered all the materials for this Sticks and Stones Quilt.  
Going to start cutting all the strips out.  


I cut the Cotton Supremes French Vanilla by RJR Fabrics into 2 1/2 inch squares, then 
I took the Juicy Jewel strip pack and took all the strips and cut them up into 
2 1/2", 4 1/2", 6 1/2", 8 1/2", and 10 1/2" inch pieces.  


This is what became of all those strips below.


The first row, I put a 10 1/2" and 2 1/2" together. 
Second row, there is a 2 1/2" and another 2 1/2" and a 8 1/2".
Third row, there is a 4 1/2" and another 2 1/2" and a 6 1/2".
Forth, Fifth, and Six rows are the reverse of the first three.


I just love these colors together...  Blues, Greens and Purples are some of my
 favorite colors.  


We'll I thought this might be a challenging quilt top for me to do since, I like things a little more symmetrical.

 In this case it would be the colors not matching, meaning each being an identical block 
like the others ....  

Some might call this a slight compulsive disorder.  So, I'm really going to lean towards the creative artistic side of my brain in this quilt design creation. 


We'll.... I weathered the storm in my mind, and just let the creativeness juices flow and fall where they may....
 and this was very impowering and I feel
 pretty good about that!

And most of all the quilt is turning 
out so beautifully.  

Did I say earlier, that these are some my favorite colors and I'm already struggling with having to let go of this quilt, but I did promise this one to the kids, and they where estatic about that so, I must keep my word, it will be their quilt.... so sad for me :(


Quilting time - we all got together at the church to work on our projects.


Here is Stephanie R. cutting her strips for her fence rail quilt, and Stephanie D. in the back ground working on her project,


Brenda crocheting and chatting with Sara


Stephanie first time quilting and happy that she has completed
 cutting out all her strips.


I share more when we get together again!

Monday, February 1, 2021

Purebred Throw Quilt

When I first saw this print, it evoked childhood memories of growing up in Montana with horses all around.  How I was crazy about horses and loved to do paint by numbers... and it was the horse prints that I would paint.  So I decided to make a throw quilt.  I just needed to find the design I wanted to use and buy the fabric.


As I was looking for this fabric, I found it was part of a collection.....

Purebred is another collection in the fabulous paint-by-number style of Erin Michael. It reflects the majesty and charm of the thoroughbred horse, and was designed in honor of the year of the horse and the excitement of the Triple Crown race. Romantic florals evoke the beautiful blankets of flowers that adorn the winner’s circle while retaining a whimsical, childlike charm when mixed in a paint by number style. Romantic florals evoke the beautiful blankets of flowers that adorn the winner’s circle while retaining a whimsical, childlike charm when mixed in a paint by number style. Romantic florals evoke the beautiful blankets of flowers that adorn the winner’s circle while retaining a whimsical, childlike charm when mixed in a paint by number style.


I just love this fabric!


After much meditating on which design pattern to use, a decision was made to utilize as much of the horse scenes as possible, so we choose to use the disappearing 9 patch for this quilt.  


Backing, binding, and pillowcase fabric.


All color and design combinations. 


The design coming together.


The Layout coming together. 


The 9 patch square.


The Disappearing 9 patch square.


Quilt top finished and ready for the batting and backing.


The colors aligned nicely, I think that this is going to be a favorite throw for the family room!


I thought I would do something different on the quilt... I didn’t want to sew through the print with hard lines on the backing print by machine quilting it all together.   I attached the quilt top to the batting and I also added a little extra touch by adding chenille yarn to the top of the quilt with invisible thread.  I put a bordering around each of the squares on the front of the quilt top.


Then I pinned the backing onto the other side of batting and quilt top, then hand tied the backing to the batting and quilt top, making sure that the chenille yarn did not come through the front of the quilt.  It was a great combination, it gave the quilt a lot of texture and uniqueness.  That’s what you call thinking outside the box and being creative!


Now where cutting the binding strips.


Sewing the binding on the quilt.


Last to pics is the finished lap throw quilt for the family room here at the ranch.  
I so happy with the way it turned out!


Wednesday, January 20, 2021

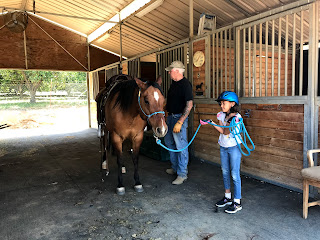
A Girls Best Friend/ For the Love of Horses


This was something I meant to post a while back, and decided it was still worthy to be posted...

It was a Beautiful Day here in Sunny So Cal, not to hot, not to cold for the beginning of May.  It was great day at the ranch for so fun.  

Gracie has been wanting to ride Cheyenne for awhile now, so she is getting that opportunity today.


She went to put on her boots, well needless to say, she needs a new pair.... all winter she has been wearing her rain boots all winter.  But that won’t stop the ride today!


Spending time with Raider


Saturday, June 1, 2019

The Love for Essential Oils


Passionate about these Jewels

There is many reasons why I use Young Living Essential Oils on a daily basis now.  Probably one of the biggest reasons... is the impact they have made on my life in a very positive way.  I have use Essential Oils (EO’s) for many years now, mostly in my handcrafted natural soaps, but have dabbled a little with a few oils to support with  different needs.   

With out going into all the details... A few years back my husband got cancer, we went through the chemo process, it was so bad, he was so weak and frail, we almost lost him, this was a true miracle... I thank God he is in remission now.  Maybe less than a year later my daughter-in-law got breast cancer, she is doing better at this present time.  But though this whole process, after being the caregiver for a few years now between the both of them having cancer back to back, and helping with my grand daughter full-time through my daughter-in-law cancer and recovery process... when everything seemed to be getting back to normal, my body started to fall apart.  I started having a lot of issues throughout my body.  My grand daughter also has some issues we have dealt with since she was born.  
So I started looking for more natural remedies for relief and help in supporting with sleep, stress, emotions, skin, seasonal support, detoxing, immunity, pain, breathing and digestion, along with inflammation, swelling in the body.  I was on a mission to rid our home from products with toxic chemicals... making it a clean and green environment.  
Yes... Removing all cleaning products with chemicals from our household, replacing them with natural plant based products.  
I was on a wellness mission for the whole family! 


Why is this saying, so true?  
I guess we all think we are super men/women... 
this will never happen to me!  


We should all care what we put in our bodies and what we put on them also.  
My family... we are making these serious choices, decisions and changing our future. 

As it was said by a good friend some years back, We are all just one doctors 
visit from a life changing event.  

Why not try to give your family a fighting chance with true wellness!  I’m taking this to heart... Wellness has become very important to our family.

 So when my journey began...  I started researching different Essential Oils, their properties and benefits... also the different companies that where out then the market.  I found that not all essential oils are equal.  For many reasons I choose Young Living, but here are a just a few reasons why I choose Young Living Essential Oils.


The Seed to Seal Promise was a key component in my decision making, choosing the right company for my essential oil needs!


I have found that essential oils help support: sleep, stress, emotions, skin, seasonal support, detoxing, immunity, pain, breathing and digestion. 

These are my little Treasured Jewels 


I love sharing about this oily journey that I’m on... So here is their website for your convenience and personal research... Young Living Essential Oils .  

Send me a message... if you would like to know more or if you would like to join the oily family, or just click this... My Link... to buy your oils retail or 
become a member and get your oils wholesale and many other great benefits too.


Friday, March 1, 2019

Tea Cake


STEP ONE

Cake Mix
1 cup brown sugar
1 cup pure cane sugar
3 cups cake flour
2 teaspoons baking powder
1 teaspoon baking soda
2 teaspoon salt
2 eggs
2 teaspoons pure vanilla extract
1 3/4 cup buttermilk
1 3/4 cup vegetable oil

First preheat your oven to 375 degrees.  This next part is very easy!  Just sift together the dry ingredients and then whisk together the wet ingredients in a separate bowl.  Slowly add them together until well mixed.  Then spoon into a deep 9×13 (or shallow 11×15) dish that has been greased and lightly floured.  Bake for 20 minutes at 375 degress and then drop the temperature down to 250 degrees.  Bake for another 30 minutes or until the top is lightly browned and a test stick inserted in the middle comes out clean. 


STEP TWO 

Glaze
1/4 cup pure cane sugar
1/2 cup buttermilk
1/4 cup butter
1/2 teaspoon baking soda
1/2 teaspoon pure vanilla extract

For this next part get out a small pot and combine the first four ingredients and while stirring  continuously bring to a slight boil.  Set aside and add vanilla.  Take your testing stick and poke holes all over the warm cake and spoon this glaze evenly over it.  If there is extra glaze on the edges just take your tester stick and pull the edge away so it falls down the sides all around.  Put cake in a cool place and let cool completely before frosting!  I let mine cool over night in the refrigerator with foil over the top. 


STEP THREE

Frosting
8 oz softened cream cheese
1/2 stick of unsalted butter
1 teaspoon  pure vanilla extract
2 cups powdered sugar ( or more to taste)
4 tablespoons heavy cream

Beat first three ingredients in large mixing bowl.  Slowly add the powdered sugar and last the cream until the mixture is creamy and spreadable.  Spread over the top of your cake and slice.