Saturday, November 5, 2016

A New Addition to the Sewing Room - My Vintage 1958 Singer 222K Featherweight - Part 1


This picture reminds me of myself at that age...  I was so eager to learn to sew at a very early age, that I bothered everyone and anyone to see if they would teach me to sew.  One of my grandmothers was very instrumental in me learning at an early age.  I guess she saw a spark there, and just fanned it.  Then who would have thought it, but my dad followed up and encouraged me to continue to sew and helped guide me through his knowledge of sewing.


This is what I learned to sew on, the treadle machine that started my journey into quilting and sewing.


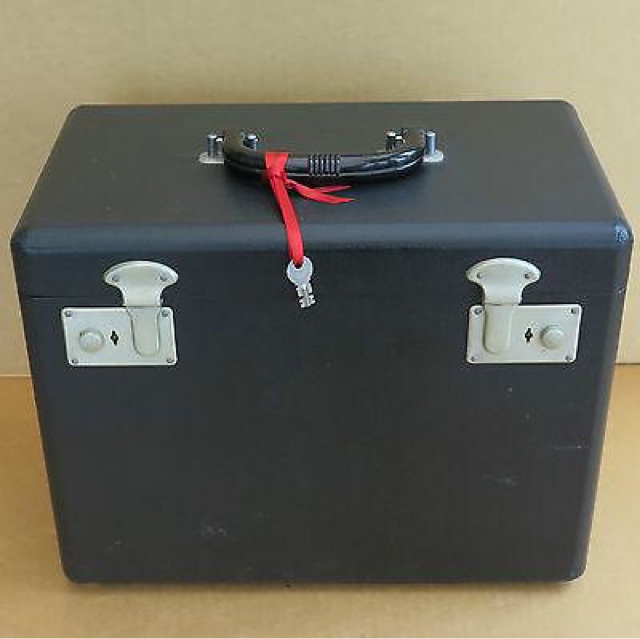
We'll here is the new addition, weighing in at only 11 1/2 lbs.... My 1958 Singer 222K Freearm Featherweight Machine. This machine can free motion quilt, embroidery and darn, now this machine is 58 years old this year..  I can not wait to try it out soon!  

There is a story behind my 1958... I have been wanting a Featherweight for many years now, taking my time figuring out what I really wanted a 221 or 222, but leaning to the 222K for my first FW.  Earlier this year my husband was diagnosed with cancer, a then I knew what I wanted to do.  I was going to choose his birth year in a 1958- 222K FW.  I had showed my husband a couple of machines that I was looking at a 1936 FW 221, and the 1958 FW 222K, and the last one was a white FW 221 that was close as I could find to 1962.  Then before I knew it... there was a package that arrived here at the house and he had bought a Featherweight for me.  Do you know it was the same machine that I had chose.  I was so happy... I cried like a baby!   Now I must find a name that is fitting to call my little Featherweight Sewing Machine.

***********************************************************

For the Love of the Vintage Singer Featherweight Machines 221's and 222K's.

At first glance the Singer Featherweight 221 and 222K sewing machines can look like a child’s toy, as they are so small and compact in their carrying case.  However their diminutive size did not detract from their functionality and they became highly popular with occasional sewers and Quilter's, because they were so easy to pack neatly away for storage and travel.

The 222K only came in black, and the 221 came in black, white and tan.... All depending on the year they were made.

I have had an old singer machine, that basically sewed a strait line, did zig zag and made button holes, before my husband bought the the Babylock Elegante Embroidery Machine about 15 years back, I have used the embroidery feature a lot making baby quilts with Peter Rabbit and friends and such.  Then about 5 years ago, I decided to pick up a small machine to carry along on outings, so I could go quilt with friends. For many, many years now I have had what some might call an obsession with wanting a vintage singer featherweight sewing machine.  Maybe I do, because I don't just want one, I want two, or maybe three, or something like that.... Is the an obsession? 


The 222K Freearms were made in Kilbowie plant in Clydebank, Scotland from 1953 to 1961, some of the 222K's where sent to the St. John’s, Newfoundland plant in Canada for 110 volt motors, while others recieved 220 volt motors.


From its introduction in 1933 the 221/221K went through 4 major variations until production was finally ceased in the late 1960's. An enhanced 222K freearm model was introduced in 1953, with embroidery, and darning capabilities.


The most recognizable differences between the 222 and the 221 is the face plates, and the darning lever on the front of the machine.


The 221 Singer Featherweight Machines 
Featherweights were produced at three locations:
  • Model 221 Featherweights were produced at Singer’s Elizabethport facility in Elizabeth, New Jersey from 1933 to 1957. 
  • Model 221-1 Featherweights were produced at Elizabethport from 1935 to 1951. 
  • Model 221K Featherweights were produced at Singer’s Kilbowie facility at Clydebank, Scotland from 1947 to 1961.
  • White/Green & Beige/Tan machines were produced at Clydebank, Scotland and St. John’s, Newfoundland, Canada (Beige/Tan) from 1945 to 1963. (JB 1945-1948 JC 1948-1959 JD 1959-1963)


See coordinating badges below.........
Specialty Machines

Texas Centennial (1936) 
Wrinkle (December 1939 & August 1940)
Blackside (July 1941 & September 1945)
Red S (1959-1961)

Free-Arm Featherweight

The 222K Model (1953-1961)

Featherweight Colors

(Besides Black)

(aka:  Pale Turquoise or Celery Green)


Standard Badge in 1950 and before 1950

Standard Badge in 1951 and after 1951


Here is the colors of the later years of the 1960's...... White and Tan


(aka:  Pale Turquoise or Celery Green)


Very Rare Featherweights are the Blackside and Crinkle Machines

I found some very interesting articles at www.Singer-Featherweight.com ......
On both the Blackside and the Crinkle/Wrinkle Featherweights below.... Enjoy!

https://singer-featherweight.com/blogs/schoolhouse/67189955-blackside-finish
https://singer-featherweight.com/blogs/schoolhouse/67179395-singer-wrinkle-crinkle-featherweight-221

I waould like to thank April, Cameron and family at http://singer-featherweight.com ... for their research on these beautiful little gems called Featherweights!


The “Blackside Featherweight” can be an obscure find, unless you know what to look for, because it may just look like a regular Featherweight with only a few darker looking parts. However, there are some important distinctives, so you don't want to presume that just because a Featherweight has a blackside part, that it falls into the collectible “Blackside Featherweight” category. Proceed cautiously when purchasing one.  

The Blackside


The Crinkle/Wrinkle


Hope you come back for part 2.  I'm sure there will be a part 2...  sometime in the future and maybe even another addition as well !


Saturday, October 1, 2016

Teaching Savannah how to make a Rag Quilt

This last summer a good friends daughter wanted to learn how to quilt.  
So I decided, that I would show Savannah how to make a rag quilt.  
I think 8 years old is a good age to start learning about the workings of a sewing machine and learning how to sew a quilt.  


We started with the choosing her fabrics and her embroidery designs.  She has chosen butterflies for her theme for this rag quilt.   She choose a light pink flannel for the top of her quilt, in which she machine embroideried butterflies on some of the squares, then for her back of the quilt, she choose a yellow flannel with brightly colored glittered butterflies.


Measuring out our square quilt blocks and then cutting them.


Preparing and getting ready to sew the quilt squares together.


We arranged the quilt squares to see the design, before we started to sew them together.


Clipping the seams on the front of the quilt before washing and drying three or four times to let the seam fray and unravel for that soft comfy cuddly feel that we all love so much.  


She wrote her name on her quilt with glitter sparkle paint.


Then washing and drying the quilt about three or four times, then viola her quilt is finished! 


Saturday, September 3, 2016

Kings Ranch Casserole


I found two places that have great Kings Ranch Chicken Casserole Recipes, its hard to decide which I like better... I like them both! 

Deep South Dish and Southern Living

Here are both recipes, try them... you be the judge!


Prep time: 25 min |Cook time: 35 min |Yield: About 10 servings

Ingredients

Chicken Seasoning:

  • 4 cups of cooked chopped or shredded chicken
  • 2 teaspoons of chili powder
  • 1/2 tablespoon of cumin powder
  • 1/4 teaspoon of garlic powder
  • 1/4 teaspoon of Cajun seasoning or cayenne
Sauce: 
  • 1/4 cup (1/2 a stick) of unsalted butter
  • 2 tablespoons of all purpose flour
  • 1 cup of chopped onion
  • 1/2 cup of chopped red, yellow or orange bell pepper
  • 1 cup of chopped poblano pepper
  • 1 can of mild Rotel tomatoes with green chilies, drained
  • 1 cup of chicken stock or broth
  • 1/2 cup of heavy cream
  • 1/2 cup of sour cream
  • 2 teaspoons of lime zest
  • 1/8 cup of chopped fresh cilantro
  • Kosher salt and freshly cracked black pepper, to taste
For Layering:
  • 12 corn tortillas
  • 2 cups of shredded jack cheese or pepper jack
  • 2 cups of shredded cheddar cheese
  • Additional sour cream and cilantro, for garnish
Instructions

Preheat oven to 350 degrees F. Spray a 9 x 13 inch casserole dish with non-stick spray; set aside. Place the chicken in a bowl and add the chili powder, cumin, garlic powder and cayenne. Toss well and set aside.

Melt the butter in a large skillet and stir in the flour. Cook and stir for about 3 minutes, or until lightly browned. Add the chopped onion and peppers; cook and stir just until tender, but not browned. Add the drained tomatoes, cook and stir another 2 minutes. Slowly add in the chicken broth, then the cream, stirring until fully incorporated and heated through. Remove and set aside 1/3 cup of the sauce. Add the chicken to the skillet, stir to heat through, add the sour cream, lime zest, cilantro, and salt and pepper; mix well and remove from heat. Taste and adjust salt and pepper as needed.

Add the reserved 1/3 cup of sauce to the bottom of the prepared baking dish and spread out. Add 6 whole corn tortillas to the bottom of the dish, overlapping them. Spoon the chicken mixture over the top of that. Mix the two shredded cheeses together; sprinkle 2 cups of the cheese on top of the chicken mixture. Repeat layers of corn tortillas, chicken mixture and ending with the remaining 2 cups of cheese.

Bake at 350 degrees F for 30 to 35 minutes or until bubbly and lightly browned on top. For nice layered slices, let the casserole rest at least 5 to 10 minutes before slicing. Serve with a dab of sour cream and a sprinkle of freshly chopped cilantro, if desired.

Cook's Notes: I used meat from a roasted chicken that I had previously cooked and frozen, broth made from Better than Bouillon, a chipotle chili powder, smoked cumin, and sweet onion. This casserole can be assembled and refrigerated or frozen. Thaw overnight in the refrigerator, bring to room temperature and bake. May also use flour tortillas.

Tip: Dip the tortillas in chicken broth before putting in the dish, and says it really makes a difference and is even better if you have some rich hen broth. She also adds some diced pimiento.

Shortcut King Ranch: Shortcut the process by using canned cream soups. Skip the butter and flour roux and homemade sauce (broth, cream, and sour cream) and substitute a family sized can of cream of mushroom, or a combination of two regular sized cans, one cream of chicken, the other cream of mushroom. Adjust or eliminate salt as needed. Instead of corn tortillas, you can also roughly crumble in some plain tortilla chips, though you'll need to consider the sodium level and likely eliminate the salt. Can also shred the tortillas, but you'll need more of them.

Beef King Ranch: Substitute 2 pounds of cooked and drained ground beef or about 4 cups of shredded, cooked beef roast or brisket and beef stock or broth.

Source: http://deepsouthdish.com   


  • Makes 8 to 10 servings

Ingredients

  • 1 (4 1/2- to 5-lb. ) whole chicken
  • 2 celery ribs, cut into 3 pieces each
  • 2 carrots, cut into 3 pieces each
  • 2 1/2 to 3 tsp. salt
  • 2 tablespoons butter
  • 1 medium onion, chopped
  • 1 medium-size green bell pepper, chopped
  • 1 garlic clove, pressed
  • 1 (10 3/4-oz.) can cream of mushroom soup
  • 1 (10 3/4-oz.) can cream of chicken soup
  • 2 (10-oz.) cans diced tomatoes and green chiles, drained
  • 1 teaspoon dried oregano
  • 1 teaspoon ground cumin
  • 1 teaspoon Mexican-style chili powder*
  • 3 cups grated sharp Cheddar cheese
  • 12 (6-inch) fajita-size corn tortillas, cut into 1/2-inch strips

Preparation

1. If applicable, remove giblets from chicken, and reserve for another use. Rinse chicken.
2. Place chicken, celery, carrots, and salt in a large Dutch oven with water to cover. Bring to a boil over medium-high heat; reduce heat to low. Cover and simmer 50 minutes to 1 hour or until chicken is done. Remove from heat. Remove chicken from broth; cool 30 minutes. Remove and reserve 3/4 cup cooking liquid. Strain any remaining cooking liquid, and reserve for another use.
3. Preheat oven to 350°. Melt butter in a large skillet over medium-high heat. Add onion, and sauté 6 to 7 minutes or until tender. Add bell pepper and garlic, and sauté 3 to 4 minutes. Stir in reserved 3/4 cup cooking liquid, cream of mushroom soup, and next 5 ingredients. Cook, stirring occasionally, 8 minutes.
4. Skin and bone chicken; shred meat into bite-size pieces. Layer half of chicken in a lightly greased 13- x 9-inch baking dish. Top with half of soup mixture and 1 cup Cheddar cheese. Cover with half of corn tortilla strips. Repeat layers once. Top with remaining 1 cup cheese.
5. Bake at 350° for 55 minutes to 1 hour or until bubbly. Let stand 10 minutes before serving.

*1 tsp. chili powder and 1/8 tsp. ground red pepper may be substituted for Mexican-style chili powder.

Lightened King Ranch Chicken Casserole: Reduce butter to 1 Tbsp. Substitute reduced-fat cream of mushroom and cream of chicken soup for regular and 2% reduced-fat cheese for regular. Prepare recipe as directed through Step 4. Bake, covered, at 350° for 50 minutes; uncover and bake for 10 to 15 minutes or until bubbly. Let stand 10 minutes before serving.

Note: For testing purposes only, we used Cracker Barrel 2% Milk Natural Sharp Cheddar Cheese.

Quick-and-Easy King Ranch Chicken Casserole: Substitute 1 (2-lb.) skinned, boned, and shredded deli-roasted chicken for whole chicken, 3 cups coarsely crumbled lime-flavored white corn tortilla chips for corn tortillas, and 3/4 cup chicken broth for cooking liquid. Omit celery, carrots, and salt. Prepare recipe as directed, beginning with Step 3.

Source: Southern Living


Saturday, August 6, 2016

Reminiscing - Lifes Journey through Quilts

Recently I was going through..... 
 a cleaning out and rearranging of my Sewing/Craft Room!

We'll I started reminiscing... 
on how I came to love quilting so.

It all started when I was very young, both my grandmothers quilted and had the old treadle style sewing machines.  Most of us at that age 5 or 6 was just fascinated with the big wheel and foot pedal of the machine, just a big toy in which you wouldn't ever get to play!

I remember matching colors of fabric and creating, back at the age 6 to 8 years of age, while they sewed on this neat old vintage sewing machine.  I would sit beside them, watching as they sewed  their pieces together, and explained the process of how the machine worked.  I just enjoyed watching their master pieces come together.


I have many quilt projects in the works, but here is one that is seen more time in the sewing trunk, than on the sewing table.   You, know the term... out of site, out of mind!  We'll it is in the forefront now.... and longing to be finished!   I guess I started this quilt not to long after we moved from Northern California in 2003 to New Mexico, then I carried it to Louisiana 2009, and now Southern California where it is longing to be finished 2015!  I guess, I actually started this quilt in about 2007. 


I just love my Ellegante... Babylock Embroidery Sewing Machine

Here is a closer, and a much better picture, below!


When my grand daughter came along, quilting again slowed to a small crawl... not much activity in the quilting room, but recently over the past year or so, I have made several baby blankets for friends.  I made Gracie a blanket using all her baby receiving blankets, and made her a quilt this year for her birthday, now her mama wants a quilt, maybe mine will be next!  

Now... you know mom's always put everyone and everything before themselves.  That might, just be me, Let me know, if I'm way out in left field here... But that is the way it is for me!

You can find a few of these other Blankets/Quilts in my blogs, not all but some!


Juicy Jewels by Island Batiks  and  the French Vanilla by RJR

So, my daughter Stephanie's quilt front to is almost finished.  I need to order her backing, from the Missouri Star Quilt Company soon.  I bought her fabric their for the front of her quilt.  I had an opportunity to go through Missouri and stop at their shop in September.  Wow...  I was blown away by their shops, all their fabric, and what they have accomplished.  Quilt Town, USA,  that is exactly it.   If you grew up in a small town, you know what I mean... there is not much there!  To bad I didn't live closer to their shop...  we'll I know my husband is glad we live this far away!  :)  

Then I need to make an appointment to go machine quilt her quilt at the Quilter's Cocoon her in Riverside, California.  I wish I had room for one of these big long arm machines in my house. 

I quilted Gracie's Elsa and Ann's quilt there at the Quilter's Cocoon.


Challenging myself... I am setting for myself a goal to finish the Celtic Plaid Quilt 
by the end of 2016.